Table / list
UITableViewController is controller for displaying a scrollable vertical list of cells. It conforms to following protocols:
- UITableViewDelegate protocol responds for managing selections, configuring section headers and footers, deleting and reordering cells, and performing other actions in a table view
- UITableViewDataSource protocol responds to data-related requests from the table. It also manages the table's data directly, or coordinates with other parts of your app to manage that data
UITableView view that presents data using rows in a single column.
UITableViewCell class responds for the visual representation of a single row in a table view:
- Applying a selection or highlight color to the cell.
- Adding standard accessory views, such as a detail or disclosure control.
- Putting the cell into an editable state.
- Indenting the cell's content to create a visual hierarchy in your table.
table creation
Create new subclass of UITableViewController.
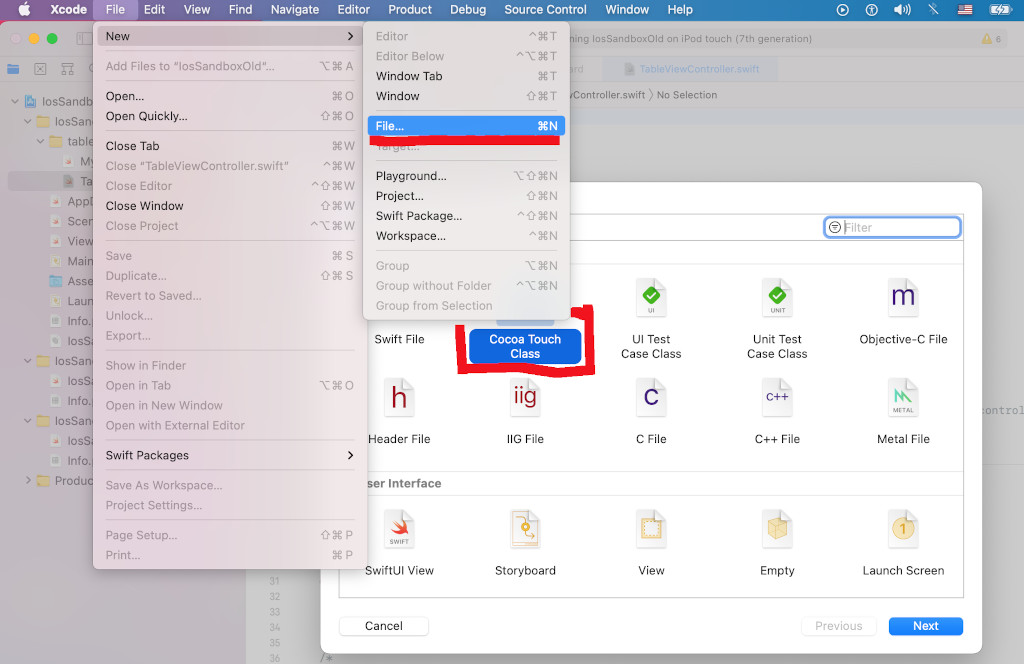
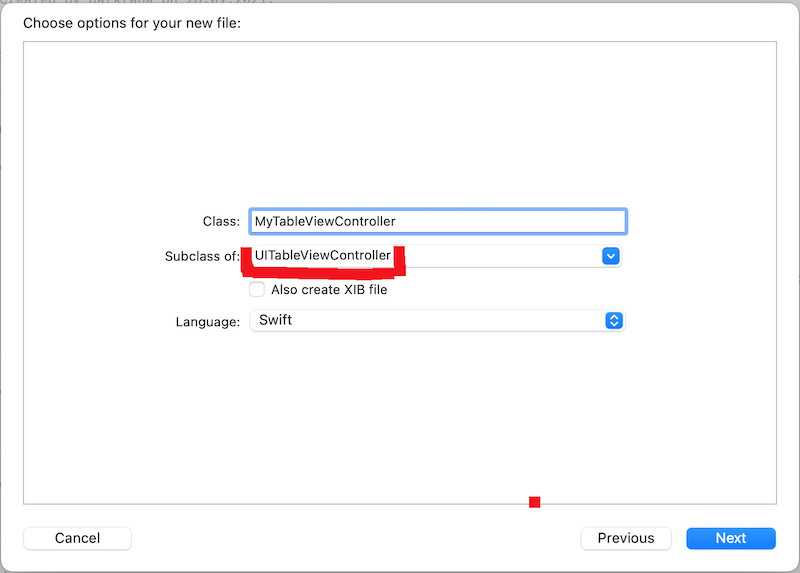
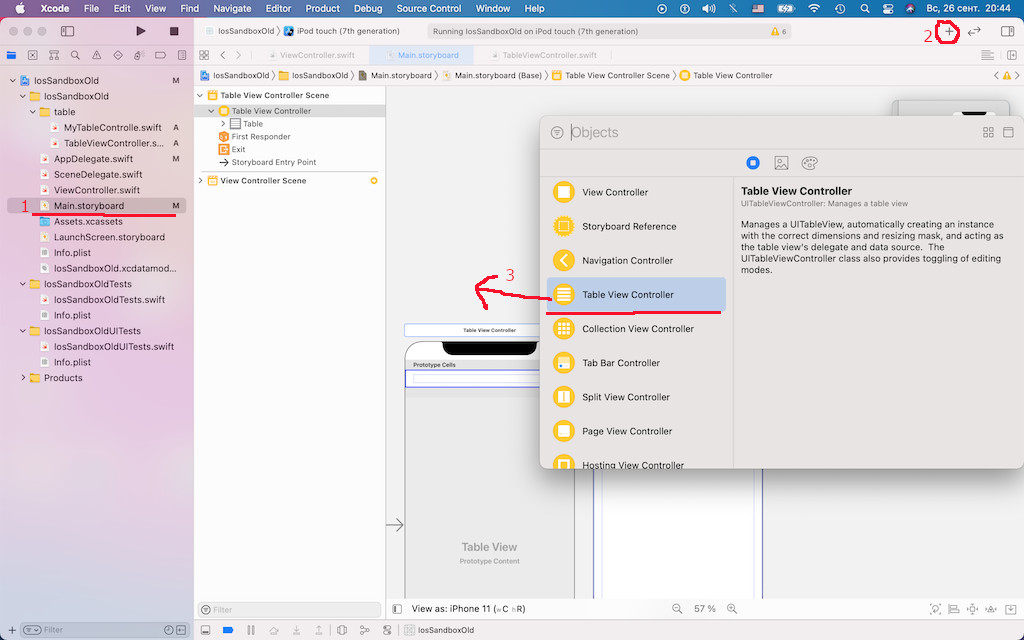
To add a table view to your interface, drag a UITableViewController to your storyboard. Xcode creates a new scene that includes both the view controller and a table view with one cell prototype. Then specify subclass of UITableViewController

Access the table view using the tableView property.
import UIKit

class TableViewController: UITableViewController {

    var rowsTxt = ["row 1341","row 2","row 3","row 4","row 5","row 6","row 7",
                   "row 8","row 9","row 10","row 11","row 12","row 13","row 14"]


    override func viewDidLoad() {
        super.viewDidLoad()
        // ...
    }

    override func tableView(_ tableView: UITableView,
                            numberOfRowsInSection section: Int) -> Int {
        // #warning Incomplete implementation, return the number of rows
        print(rowsTxt.count)
        return rowsTxt.count
    }

    override func tableView(_ tableView: UITableView,
                            cellForRowAt indexPath: IndexPath) -> UITableViewCell {
        // reusing cell
        let cell = tableView.dequeueReusableCell(withIdentifier: "CellDefault",
                                                 for: indexPath)
        cell.textLabel?.text = rowsTxt[indexPath.row]
        return cell
    }
}
You can use UITableView without UITableViewController with any controller as part of UI.
headers/footers
The table style affects the header/footer:
- .plain - default style, headers and footers will be sticked over the table
- .grouped - headers and footers will be scrolled
- .insetGrouped - a table view where the grouped sections are inset with rounded corners
You can specify table header and footer via properties of table view:
- tableHeaderView
- tableFooterView
- sectionHeaderHeight
- sectionFooterHeight
You can specify header and footer of a table section by overriding methods of UITableViewDelegate protocol. Use the CGFloat.leastNormalMagnitude value as the header height to hide header.
refreshing
// refresh everything
tableView.reloadData()

// refresh specified rows
let indexPathRow: Int = 0
let indexPosition = IndexPath(row: indexPathRow, section: 0)
tableView.reloadRows(at: [indexPosition], with: .none)
over scrolling
The UITableView class extends the UIScrollView class and the UITableViewDelegate protocol extends the UIScrollViewDelegate protocol.
The bounces property controls whether the scroll view bounces past the edge of content and back again. If the value is false, scrolling stops immediately at the content boundary without bouncing. The default value is true.
You can disable overscrolling in one direction via scrollViewDidScroll(scrollView:) method of the UIScrollViewDelegate protocol.
func scrollViewDidScroll(_ scrollView: UIScrollView){
    // disable overscrolling at the bottom
    scrollView.bounces = scrollView.panGestureRecognizer.translation(in: scrollView.superview).y > 0

    /* i.e.
    if(scrollView.panGestureRecognizer.translation(in: scrollView.superview).y > 0) {
        // to do on up scroll
        tableView.bounces=true
             }
     else {
        // to do on down scroll
        tableView.bounces=false
     }
} */
UITableView extension
There are some extension methods that you can define for the UITableView.
public extension UITableView {

    static func create(style: UITableView.Style,  with mutation: (UITableView) -> Void) -> UITableView {
        let view = UITableView(frame: .zero, style: style)
        mutation(view)
        return view
    }

    func register<TCell: UITableViewCell>(_: TCell.Type) {
        register(TCell.self, forCellReuseIdentifier: TCell.reuseIdentifier)
    }

    func registerNib<TCell: UITableViewCell>(_: TCell.Type) {
        register(.init(nibName: TCell.reuseIdentifier,
                       bundle: nil),
                 forCellReuseIdentifier: TCell.reuseIdentifier)
    }

    func dequeueReusableCell<TCell: UITableViewCell>(for indexPath: IndexPath) -> TCell {
        guard let cell = dequeueReusableCell(withIdentifier: TCell.reuseIdentifier,
                                             for: indexPath) as? TCell else {
            fatalError("Could not dequeue cell with identifier: \(TCell.reuseIdentifier)")
        }

        return cell
    }
}

// usage
final class MyViewController: UIViewController {

    private lazy var tableView: UITableView = .create(style: .grouped) {
        $0.dataSource = self
        $0.delegate = self
        $0.sectionHeaderHeight = 0
        $0.allowsSelection = false
        $0.register(UITableViewCell.self)
        $0.register(BannerPostViewCell.self)

        let refreshControl = RefreshControlDated()
        refreshControl.addTarget(self, action: #selector(didTapRefresh), for: .valueChanged)
        refreshControl.backgroundColor = .white
        $0.refreshControl = refreshControl
    }
// ...